Patio Pavers Installation
Hardscape Design Services
Our hardscapes department works with a large selection of products, from natural rocks to concrete pavers, giving your outdoor entertainment area just the look you want. Our paver patios are constructed to withstand freezing temperatures and regular wear and tear better than concrete patios. Proper drainage solutions and construction techniques minimize cracking and settling in our patios. Our goal is to build a paver patio that will last longer than any of our competitor’s patios. If your old paver patio has cracked or settled, we may even be able to repair it.
Where to Start with a Paver Patio
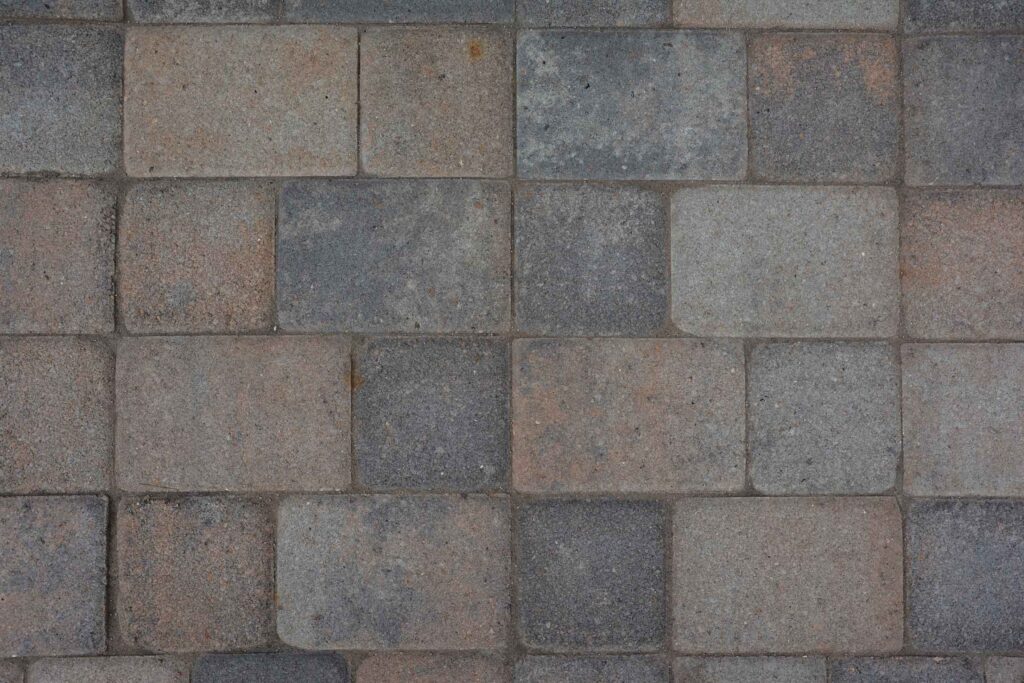
Chances are, you already have a good idea where you want to install a paver patio. The next step is choosing the paver material. There are many different options when it comes to patio pavers. A typical paver is thought of as a concrete brick or most likely a poured and formed piece of concrete specifically intended for building patios and pathways. However, many old paver patios are created from actual clay bricks. Often, the leftover bricks from the house would be re-purposed into a path or patio space. The holes in the bricks made them function more like a permeable paver, which allows water to soak in and pass through.
Today permeable pavers are used more for large driving surfaces or public spaces. In general, permeable paver patios are not as aesthetically appealing as standard paver patios or natural rock patios. The other important part of the old bricks was that they were made of clay.
Another option for patio pavers would be the use of clay pavers. Unlike old bricks, these pavers are not permeable. However, they are supposed to last longer than normal concrete pavers. We would expect a well-built patio of concrete pavers to last approximately 30-50 years before it really starts falling apart. Clay pavers are said to last 50+ years. At some point, there is a diminishing return on your patio investment, so the increased cost of clay pavers makes them less enticing.
The last common paver material used is natural stone. Due to its natural composition, natural rock qualities can significantly vary based on selection. Professionally installed natural rock paver patios are comparable in price to concrete pavers. They tend to be larger sized pieces which install faster, but the extra cost of the rock itself balances the decreased cost of the installation labor. While a natural rock patio does deteriorate faster than standard concrete pavers, it can still last 20-25 years with proper installation and maintenance. The natural rock paver patios tend to be the best value because, similar to the clay pavers, the rock itself will usually last 50+ years. The larger gaps between the natural rocks just cause more shifting and uneven areas in the patio.
The Paver Installation Process 101
Many of our clients call us wanting to install a paver patio, but they have very little knowledge of paver installation. We always begin by selecting the location and type of paver material for the patio. Then we explain the patio pavers installation process and what it actually takes to build a paver patio correctly.
Installation usually begins with any demolition needed to landscape plants or existing structures/concrete slabs. Of course, all of these things must also be hauled away and disposed of to the correct waste management facilities across Springfield. Then we begin excavation. As a rule of thumb, we like to excavate at least 1 ft wider than the actual size of the patio area. In a Gabris Landscaping paver patio, we use a minimum of approximately 6 inches of base material. The pavers are between 2 and 3 inches thick (60mm tends to be the standard paver thickness for patios, 80mm for driveways). If we add the thickness of the base material with the thickness of the pavers, we can determine the minimum depth we need to excavate. Additional inches of the dirt should be excavated and graded to provide a minimum of about a 10% slope for drainage. A 1 inch drop every 10 feet should get give just enough grade to prevent water from pooling under the pavers.
After demo and excavation for the patio paver installation, we usually lay out a sediment shield on the prepared area. Then we fill the excavated area with 2-3 inches of clean limestone gravel and pack it down. Although it’s a little more expensive than other sizes of gravel, our preference is 3/4 clean limestone gravel. The 3/4 clean limestone gravel seems to have a good balance of compact-ability and porous space. This balance allows for a solid structure which drains well. Of course, laying pavers on 3/4 clean gravel would be quite the chore, so we lay a second sediment shield over the gravel area to completely enclose it. Our sediment shields are permeable to allow water in and out, without clogging the drain with dirt, sand, and silt. A quality commercial grade weed barrier fabric is as good as any sediment shield products and is usually readily available at local nurseries and landscape suppliers. It is quite common for inexperienced landscapers to skip right past these first steps of the process. Skipping the drainage and excavation steps will lead to the early demise of the structural integrity of your paver patio though. So, buyer’s beware: all paver patios are not created equally.
Once the excavation and drainage layer are in place, we spread and compact 3-4 inches of limestone sand on top of the second sediment shield. Limestone sand is also known as “crusher screenings” at many quarries. One of our suppliers even labels their limestone sand as “bedding sand.” We would advise not to use beach or play sand for building your patio structure because it does not compact the same as limestone. Beach sand is also quite a bit more expensive here in Missouri. The limestone sand is much faster and easier to set pavers on than beach sand as well.
After the base material is all compacted down to the correct height for laying your pavers, you are ready to begin laying pavers in place. Some companies use the screed and set method to lay pavers. While the time savings of this method are undeniable, it often leaves quite a few softer spots in the base or uneven pavers which can create eye sores or tripping hazards in the patio. Our hardscapes team hand-sets each and every paver or rock they lay. We do use screeding while compacting to get as close to grade as possible. However, we come back and hand-level every single paver for the best possible transitions and grade of patio possible. After the pavers are all laid out, including the cut pieces for all of the edges, we install a paver edging restraint using 9 inch long nails along any edges not restrained by solid concrete or block. Then it is time for the final step.
Sanding the patio is the final step. Years ago, play sand was used for this process. Water would flow through this sand like a permeable paver. Depending on how the base of the patio was constructed, this water would either drain through or puddle. A beach sand base with beach sand for the paver gaps ought to be a normal functioning patio, but if a limestone sand patio is finished with a beach sand in its gaps, the water will puddle on the limestone sand and shift the patio all around. The drainage layer installed at the beginning was only intended to handle water flowing on the ground into the base of the structure from the sides.
To control the water flow on top of the patio, we seal it water tight with a special polymeric sand product. The polymeric sand products we use most often are from a brand called Alliance Gator. Click their name to check out their website for more information. The polymeric sand is simply brushed in to the cracks between the pavers, and then it is watered in. For the best results, be sure to blow off the excess product prior to watering in the polymeric sand with a mechanical blower.
A stronger polymeric sand product is used to seal the larger gaps for patios common in natural rock or flagstone patios (sometimes referred to as fieldstone patios). We know this stronger polymer product as “polymeric dust” because that is what Alliance Gator calls their stronger polymeric sand product.
Paver patios can be sealed with special concrete, brick, and stone sealants to prevent staining. The polymeric sand only seals the pavers tight for water control. Often customers ask about “sealing” their patio. Understanding that one sealant is for stains and preservation of the concrete product itself (the pavers) and the other sealing process via polymeric sand is simply for water control and paver stabilization can really clarify things when trying to schedule a paver maintenance service. It is normal for a brand new patio to settle and develop gaps in the polymer sand for the first 6 months to a year. At that time, we do recommend scheduling the first maintenance service for paver patios to re-seal the polymeric sand. Usually a patio can go several years before needing to be sanded again, but regular sanding will significantly increase the useful life of a paver patio.
If you have made it this far, and the paver patio still doesn’t pop the way you imagined it would, there is a glossy coat that can be painted over the top of the pavers. This product’s color is called “wet-look” because it is essentially a clear coat of paint which will leave the patio with the glossy appearance it has after being wet down. The colors in concrete seem to be more prominent when wet, so painting on a coat of gloss designed for concrete-use can dramatically change the final appearance of a patio pavers.
This section on our website just scratches the surface of Paver Patio Installation. So, if you want it built right, our landscape professionals are just one click away. Schedule your free landscape consultation and estimates. Click here to get started.